01 09 10

Friday, December 20, 2013

Kids Fresh Green Centerpiece

Christmas is a time of celebration, great joy, and wonder.  It's also a time to exchange gifts of LOVE to our family.  What gift expresses more LOVE than a gift made by a child!


My daughter, grandkids, daycare kids, friend, and I made these simple arrangements at their special Christmas Party today!

This is what we did:
  1. We wrote each child's name on the bottom of an 8 oz. plastic cup.  You can use clear cups or cups with a printed design.
  2. We instructed the kids to turn their cups upside down and place a rubber band on each.
  3. We then gave them a 22" piece of jute yarn and told them to slip it under the rubber band.  (The rubber band helps hold the jute in place).
  4. If the kids were able to tie, they were instructed to wrap the jute around the cup and make a simple bow.  Because our group was preschool age, the adults did this part for them.
  5. The kids turned their cups right side up and placed a pre-cut piece of wet foam in each.  The foam was cut approximately 2 1/2" high and 1 3/4" wide.  Each fit snuggly to the bottom.
  6. The kids then poured about 1/2 cup of water onto their foam.  If they saw water that was not absorbed into the foam, they were told they had too much water and the extra water was dumped out.
  7. The kids then stuck small pieces of fresh greens (also pre-cut) into the wet foam leaving a space open in the center.
  8. They finished by sticking a decorated pick in the center. Any holiday pick will work or a simple pinecone on a stick as shown in the photo above.
It was fun to see the kids accomplish this activity with little or no help.  With minimal prep work, the kids completed the craft in only 10-15 minutes.  They looked quite proud of their accomplishment as they posed for photos in front of the Christmas tree!

Friday, December 6, 2013

Clay Dough Hand Print

I've been wanting to make a hand print keepsake for "Little Guy" for the longest time.  When Big Guy was small, his daycare provider, made the cutest framed glitter hand print and gifted it to me at Christmas time.  That was FOUR years ago!  Today, I finally made one for Little Guy.  I LOVE it.  We made one for Best Buddy too.

This is what we did:


This is a fairly simple project, but it did take all day to make due to drying time.

1.  Make the clay-dough:  2 cups baking soda, 1 cup cornstarch, 1 1/2 cups of water.
Mix the ingredients in a big pot over medium heat and stir.  You need to stir for several minutes. Once your mixture thickens (looking like mashed potatoes), dump it onto wax paper, cover with a damp cloth and let it cool.

2.  Form your shape.
Sprinkle your wax paper with cornstarch and roll out your dough.  The more you work it with your hands first, the softer it becomes and fewer cracks in the dough.  If you notice the dough cracking, sprinkle more corn starch and continue to use your rolling pin to smooth it out.

3.  Make your Hand Print.
Press the child's hand in the center of the dough.  Make sure you have a good indentation by pressing on each part of the child's hand.

4.  Dry in the oven.
Place the dough on a cookie sheet and bake it at 250 for about 3 hours. Let it cool completely.

5.  Sand any rough spots.

6.  Paint the hand print any color.
We painted the hand first.  The kids were able to stay in the lines fairly well (3 yrs. old).  We chose to use black on the outside to cover up where they went out of the lines with the red.  Sprinkle with glitter (if you want).  Let it dry completely.  Write the child's name and year on the front with a metallic paint pen.

7.  Spray with a clear gloss finish.
Let it dry.  Display somewhere beautiful!

 
My inspiration came from Pinterest:  Christmas Tree Ornaments  She does a really great job explaining how to make the clay dough.  She has really cute ideas for decorations for the tree.  We might try those next :)

Saturday, November 16, 2013

Holy Spirit/Dove Project

Our lesson at Sunday School was about the Holy Spirit.  The objective was to help the kids understand that Jesus sent the Holy Spirit to be with us on Earth.  The Holy Spirit helps us to:  1)  Do what God wants us to do  2)  Do what is Right  3)  Help Others  4) Pray.  The concept of the Holy Spirit can be difficult for little people to grasp because the Holy Spirit can not be seen.  We did a couple of activities during our lesson to help them out.

This is what we did:

Mystery Picture Craft:


  1.  Draw a simple dove outline, using a white crayon, onto white paper.  Make the outline fairly thick.  I drew over my outline a couple of times. 
  2. Draw an olive branch in the Dove's mouth.  I used a brown crayon for the branch and a green crayon for the leaves.
  3. The kids could only see the olive branch when they were given the paper.
  4. I instructed the kids to use watercolor paints to cover the entire page.
  5. The mystery picture;  THE DOVE shows up.
This project was completed very quickly by 5 yr. olds.  I think it took about 10 minutes.  It is a beautiful project for the kids to take home.  I'm guessing many parents hung it at home.

Dove Paper Plate Craft:


  1. I drew an outline of a dove on a paper plate.  Use the really cheap flimsy paper plates.  My plate was a little bit higher quality and it made it more difficult for the kids to cut out the pieces.
  2. Let the kids cut along the lines.
  3. Tape the wings to the back side of the body.
  4. Let the kids draw the details (beak, feet, eyes)  We used crayons.
I think it would be fun to use google eyes and white feathers too! 

This idea came from:  Catholic Icing
 
Additional Activity: 
 
I also used our puppet, Scotty the Lion, to help introduce the kids to the concept that just because you can't see something doesn't mean it doesn't exist.  I put a balloon in Scotty's bag and had the kids try to guess what was in it.  Most guessed it was a ball.   The balloon grabbed their attention right away.  I took out another balloon and tried to "blow it up" without actually blowing.  I just put it to my lips.  The kids told me I needed to blow in order for it to work.  We then talked about air - even though we can't see it, it exists, and is actually very powerful.  An example of powerful air is a storm or a tornado.  This is like the Holy Spirit.  We then tossed the balloon to each other and gave examples of what the Holy Spirit can help us to do. 


Friday, November 15, 2013

A Gift for Dad - Picture Frame

The boys and I made a birthday gift for Dad.  I think it turned out really cute. The boys were so proud of their work.  I LOVED how excited they were to give Dad a gift.

This is what we did:

Playing Football with Dad

A Picture of Dad with Lots of Hearts

  1. I bought inexpensive black frames at Walmart.  
  2. I purchased washers in a variety of sizes from Walmart.
  3. I traced the cardboard backing of each frame onto a piece of paper and cut it out.
  4. The boys drew picture for Dad on each piece of paper.
  5. We put the pictures inside the frame.
  6. The boys placed washers on the black frames - wherever they wanted.
  7. I hot glued the washers onto the frame.  (I think Tacky glue would have worked but I couldn't find our bottle.)
  8. Done!
Dad plans to bring the pictures to work to put on his desk.  I hope he is reminded of how much we love him.

The post we got our inspiration from was:  Picture Frame for Dad 


Friday, November 1, 2013

Swans & Sandhill Cranes

I LOVED visiting the Crex Meadows Wildlife Area In Grantsburg, Wisconsin.  My husband, sister, brother-in-law, and I rose early one morning in mid October so we could be at the refuge by dawn. It was awesome seeing thousands of migratory birds and listening to their chatter.  My sister captured some beautiful close-up photos of Sandhill cranes and swans floating along the shore line. You can tour the refuge from your vehicle so little or no walking is required. Maps are available at the visitors center. I highly recommend checking this place out.  You will experience nature at its finest!  

Swans

Two Sandhill Cranes


,


Painted Hydrangea

I LOVE decorating with hydrangea because it's so easy and arrangements looks great all year long.  I simply picked clusters after they turned green (the dried stage) and lightly spray painted them maroon to match the décor in my room.  That's it!  So easy and so pretty!


FYI:  If I pick clusters when they first bloom (white), and put them in a vase with fresh water,  they will last a week or so.  If I pick them after they turn green, they last all year with NO water.  I can also pick them after they turn brown for the same affect.  This Christmas I plan to spray paint brown clusters white to imitate a light dusting of snow.  I might decorate a wreath or use them in a display on my fireplace mantle.  Either way, it will be fun to bring "the outside in" and stay cozy warm in the process!

Sunday, October 13, 2013

Stone Garden Design

My friend LOVES to make crafts while camping.  With a few supplies she brought from home and some colorful stones she collected from the lake shore, she created this awesome stone design for her garden. 

This is what she did:


  1. She covered half of an old softball with Premixed Adhesive Grout but any size ball will work.
  2. She created a circular design by placing small stones in the grout then randomly placed other stones around it.
  3. She let it dry overnight.
  4. The next day she spread grout on the remaining half of the softball and continued covering it with small stones.
  5. When dry, she sealed it with a clear gloss acrylic coating spray. 
  6. She layered a variety of flat stones in her garden and placed her stone design on the top.
I LOVE her completed creation! 

Wednesday, October 9, 2013

Candy Necklace - How sweet are YOUR words!

I was looking for a quick and easy craft project for a few moms to complete as a "filler" at a MOM's Group meeting.  I found this idea on Pinterest:  Candy Necklace.  It only took minutes to complete, is super cute, and our kids LOVED them!

  This is what we did:


  1. Tear off a piece of cling wrap.  Long enough to hold about 5 pieces of candy. (The longer the cling wrap, the longer the necklace).
  2. Lay the cling wrap on a hard surface.  Fold it in half (the long way).
  3. Lay 5 pieces of wrapped candy down the center of the cling wrap.
  4. Fold one side over the candy and then the other.
  5. Cut 6-8 inch strips of curling ribbon to tie in between the pieces of candy.  
  6. Cut a longer strip of curling ribbon to tie at each end to connect the necklace.
  7. Curl the ribbon.
  8. Add the Bible verse:  Psalm 119: 103
The above link has very clear directions.  You should check out her site.  I did make a couple variations to her project.  I used less candy (less expensive) and I added the Bible verse. 

 The kids really love the candy necklaces.  I imagine there are hundreds of reasons to make these necklaces.  Big Guy and Little Guy made a couple for their friends, just because...  Since there is tying involved I had to help Big Guy and Little Guy a lot.  I'm sure older elementary kids could do the entire project by themselves.  My boys loved picking out the candy to include in the necklace.  Have fun!

Sunday, October 6, 2013

The Shrine of Our Lady of Good Help

I was blessed with the opportunity to visit a Holy Place that I learned only recently existed.  The Shrine of Our Lady of Good Help is nestled in New Franken, Wisconsin.  It is located between Green Bay and Door County. Although the shrine is an official Catholic Church Marian apparition site, ALL FAITHS ARE WELCOME. 

The shrine is "built directly over the site where Mary, the Queen of Heaven, appeared to Adele Brise, a young Belgian immigrant in October of 1859, one year after the Marian apparitions occurred at Lourdes, France."  More information is available at www.shrineofourladyofgoodhelp.com.  You can also phone 920-866-2571.  You will learn that the faithful have visited here for over 150 years.  Some have witnessed and received miracles of help and healing.  Everyone receives a quiet and beautiful place to pray.  This is truly a hallowed site, a wonderful place to visit.


Statue of Mary, The Queen of Heaven


Monday, September 30, 2013

MONSTERSAURUS by Claire Freedman and Ben Cort Project

We read the book,  "MONSTERSAURUS" for our Book Break this afternoon.  The boys LOVED this goofy story about a boy named Monty who creates three different monsters by doing the experiments in a zany science book.  We had fun with the KAPOW, POOF, and WHOOSH resulting in these silly monsters.  After reading the story, we made our own!

This is what we did:


  1. We used foam cut-outs purchased from Target.  I got a huge pack for $5.00.
  2. The boys glued googly eyes, feathers, foam teeth, horns and legs to their creatures.
  3. The put dots on the monsters with our Dot Art markers.
  4. For glue we used tacky glue.  It dries quickly and doesn't drip.  I pour a little bit of glue into a mini cupcake liner for each kiddo.  They apply the glue with Q-tips.
We worked on this project for about 20 minutes.  The boys had fun and they ROARED a lot while making them.

Hand Print Autumn Tree

The boys enjoyed working on this fall craft while I made dinner.  We could have just used crayons for this project, but Big Guy uses those at school a lot.  I think he was getting tired of them so we brought out the Dot Art (AKA Bingo Dobbers).  I think it turned out cute and I LOVE when the boys are busy while I prepare dinner!

This is what we did:


  1. I traced the arm and hand of each boy.  It is good to have them spread their fingers so that they can make leaves between the branches.
  2. I set out colored pencils, Dot Art, flower stamps and washable ink pads.
  3. The boys did whatever they wanted!

Sunday, September 29, 2013

Max's Dragon Shirt by Rosemary Wells Project

I sent my oldest (Big Guy) off to kindergarten!  He LOVES it.  So, it's just my Little Guy and me home during the day.  We've also started taking care of another boy.  He's become Little Guy's best buddy.  Little Guy and Best Buddy keep me busy.  We've started a routine of "Book Breaks" in the afternoon because Best Buddy doesn't take naps.  We read a book and then do some type of project that coordinates with the story.  Today we read, "Max's Dragon Shirt" by Rosemary Wells.  The project was simple but actually worked on a lot of pre-school skills. 

This is what we did:


1.  We read the story, "Max's Dragon Shirt" by Rosemary Wells.
2.  I printed an image of "Max".  This is the link:  Max's Dragon Shirt Printable
3.  I cut out the image.
4.  The boys glued the picture onto a piece of construction paper.
5.  They colored it by looking at the picture in the book.
6.  Notice that Little Guy was actually able to copy part of the Dragon's face onto Max's shirt.  This is the first time he has tried to replicate a picture from a book.  There are a lot of shapes to draw!
7.  We added a bunch of stickers around the page.  Kids love stickers and I think it helps with fine motor skills.
8.  I wrote Little Guy's and Best Buddy's names on their pictures with a pencil.  They traced their own names.

There was a lot of thinking that happened during this project.  They had to match colors, hold the markers correctly, peel off stickers, transfer information, etc.  While the final project isn't exactly "pinterest" worthy, the boys worked really hard.  I'm going to have them copy more pictures from books in the future.  It only took seconds to prepare and they LOVED it and learned a lot!


Be A Cheer Reader


LOVE to read and so do my "Grand" kids.  All of them were exposed to books at a very early age and thereby instilled with a passion for reading.  I firmly believe that when given the option, most children will choose to have a book read to them before choosing to watch a video. Inspired by this belief, I hope to inspire all kids, big and small, to Read, Read, Read!


 BE A CHEER READER

Open a book
Take a good look
Read!  Read! Read!

You're always a winner
When you're a beginner
Read!  Read!  Read!

There are new things to see
For both you and me
Read!  Read!  Read!

So share with a friend
The fun that won't end
Read!  Read!  Read!

Be a cheerleader
BE A CHEER READER
Yeah Books!

Sunday, September 8, 2013

The Path Is Narrow & Difficult

The first day of school has come and gone. After busy weeks of shopping for new clothes and needed supplies, my grandchildren walked out of the protective homes of their parents and into the care and guidance of others.  As their parents looked on with hardly a wave goodbye, (sound familiar?) they were probably flooded with a host of feelings - great joy, great sadness, and maybe great apprehension.  For even though weeks and years of preparation have readied their children for this special day, no one can protect them from everything that lies ahead. 

So as the new school year begins, I am reminded of these words of wisdom:


"DO NOT PREPARE THE PATH FOR YOUR CHILDREN.  RATHER, PREPARE YOUR CHILDREN FOR THE PATH." 

Jesus told us that the path is narrow and difficult. Will they be ready?  Will we be ready?
 

Monday, August 19, 2013

Science Birthday Party For 5-9 Year Old Kids

Our daughter LOVES science so we thought it would be fun to celebrate her birthday with friends and activities she LOVES most! 


This is what we did:
  1. We designed her party to start at 1:00 p.m. and end at 4:00 p.m.
  2. We decorated the entry way with blown up balloons with marbles inserted in them so the balloons hung nicely.
  3. We crisscrossed "Danger & Explosion" warning tape over the windows. 
  4. We covered three tables with a variety of colored plastic table cloths and topped them with centerpieces of "Color Changing Flowers."  We purchased white carnations and daisies and put them in vases filled with water and food coloring.  This must be done a few days in advance so the flowers absorb the colored water.
  5. We made science books for each child from three prong folders with directions to each experiment so the kids would be able to follow along and take home as a reference. We included explanations and "science laws."
  6. We prepared pizza, cut up watermelon, lemonade, and chips for lunch.
With preparations complete, the Lab Rooms were ready to receive the young scientists!

When the kids arrived we gave them name tags with colored string, safety goggles, and children's aprons that we purchased from Amazon.  The kids decorated their name tags and put them in holders to save their spot in the science lab.

We then started the party with a game.  We split the kids into three teams (according to the string color on their name tag). We gave each team a bag of marshmallows and a bucket.  One child was instructed to hold a bucket on his/her head.  The other team members were told to turn around and try to toss marshmallows into the bucket from behind their backs.  The team that got the most marshmallows into the bucket were rewarded with water balloons they could throw at the adult volunteers. 


Experiments:

 
Egg In the Bottle
Peeled Hard Boiled Egg
Matches
Paper Towel
Glass Milk Bottle
  1. Cut a strip of paper towel about 1" x 8".
  2. An adult volunteer carefully lights the strip of paper at one end and drops it into the large-mouthed bottle.
  3. While the strip of paper is still burning in the bottle, set a peeled egg on top of the mouth of the bottle.
  4. Watch carefully!  The burning strip of paper will go out.
  5. Keep watching!  The hard boiled egg will start to wiggle, then quickly squeeze through the top of the bottle and drop to the bottom.  AMAZING!!!
  6. The experiment is not over yet.  How will the egg can come back out?   Be extra careful doing this part.
  7. Turn the bottle upside down.
  8. With your mouth, forcefully blow air into the bottle.  It shouldn't take much.
  9. The egg will pop out of the bottle just like it popped in.


Why it works:

The burning piece of paper heats the air molecules inside the bottle.  Escaping molecules cause the egg to wiggle.   When the air inside the bottle cools, a "partial vacuum" occurs.  Because the air pressure outside the bottle is so great, it pushes the egg into the bottle.

                       The "Eggsclusive" Upside-Down Twist


Peeled Hard Boiled Egg
Matches
Paper Towel
Glass Milk Bottle
Candles
  1. Carefully push two or three small birthday candles into the narrower end of a peeled hard boiled egg.  Make sure the candles fit easily inside the large mouthed bottle.
  2. Light the candles and sing a quick "happy birthday song" to the birthday girl.
  3. Turn the large mouth bottle upside down and slowly place it over the burning candles.
  4. Allow the flames to heat the air inside the bottle for just a few seconds, and then place the mouth of the bottle tight against the egg.  The candles will go out and with a "pop" the egg will squeeze up into the bottle. 


What's Shaped Like an Egg? A Water Balloon!

Water Balloon
Matches
Paper Towel
Glass Milk Bottle
  1. Carefully fill a balloon with water so the balloon is about the size of a tennis ball.  It must be slightly larger than the mouth of the bottle.  Tie it off.  Make a few balloons just in case the first one breaks.
  2. Smear some water around the mouth of the bottle.
  3. An adult volunteer lights the strip of paper and quickly drops it into the bottle.
  4. Immediately put the balloon on the mouth of the bottle.  In just seconds, the balloon will start to wiggle, the flame will go out, and the balloon will be sucked inside. 
  5. What invisible force is at work and how will we get the balloon out?  Ask the children if they remember what they learned earlier about the "egg in the bottle" and air pressure.
  6. Insert a straw into the bottle next to the balloon.  When the air outside the bottle gets inside the bottle, the water balloon will come out.
Lava Lamp
(with no light)

     Clear bottle
     Vegetable Oil
     Food Coloring
    Alka selzer tablets
  1. Find a clear bottle.
  2. Fill it 2/3 full with vegetable oil.
  3. Fill the rest of it with water leaving a bit of room at the top.
  4. Add a few drops of food coloring (any color you choose).
  5. Drop in Alka Seltzer tablets and watch it go!

Why it works:

Alka Seltzer tablets contain sodium bicarbonate and citric acid.  When the tablets dissolve, they mix together and release carbon dioxide (bubbles).  The bubbles mix the oil and colored water.

Color Changing Milk

     Plate
     Milk
     Food Coloring
     Q-Tip
     Dawn Dish Soap
  1. Pour milk into the dinner plate to completely cover the bottom (about 1/4").  Allow the milk to settle.
  2. Add one drop of each of the four colors of food coloring (red, yellow, blue, and green) to the milk.  Keep the drops close together in the center of the plate of milk.
  3. Use a clean cotton swab for the next part of the experiment.  Predict what will happen when you lightly touch the tip of the cotton swab to the center of the milk.  It's important not to stir the mix.  Instruct the kids to try it and ask them what happened.
  4. Now place a drop of liquid dish soap on the other end of the cotton swab.  Place the soapy end of the cotton swab in the middle of the milk and hold it there for 10-15 seconds.  See the burst of color!  It's like the 4th of July in a bowl of milk!
  5. Add another drop of soap to the tip of the cotton swab and try it again.  Experiment with placing the cotton swab different places in the milk.  Notice that the colors in the milk continue to move even when the cotton swab is removed. 

Why it works:

Milk contains fat.  When dish soap is added, the soap attaches to the fat molecules which makes them bounce around.  The food coloring allows you to see the action.
www.stevespangler.com is a good resource for more information.

 The Pull Of Gravity (We did this with using only the ruler)
     Ruler
     Two People
  1. Lay a 12 inch ruler flat on a sheet of white cardboard.  Use a pencil to draw a line all around the ruler.
  2. Use a pair of scissors to carefully cut out the shape from the cardboard.
  3. Divide the cardboard into six equal parts.  Color each part brightly with markers.
  4. Ask a friend to hold the cardboard hanging down just above your outstretched hand.  When your friend releases it, try to catch the cardboard as quickly as you can.

Why it works:

Your brain sends a message to your hand to catch the cardboard but sometimes gravity is faster than you think!
                                                                        

Soda Geyser

     2 liter Bottle of Diet Coke
     Roll of Mentos
     Apron
     Safety Goggles
  1. Find flat land and set your bottle of Coke down.
  2. Carefully open your bottle of Diet Coke.
  3. Drop two or more Mentos into the bottle of Diet Coke at the same time.
  4. RUN, RUN, RUN!  Well, ok, just take several steps back.
  5. Watch the bottle erupt!


Why it works:

Soda is bubbly because it contains invisible carbon dioxide gas.  It also contains a lot of water molecules which hold the gas bubbles.  This forms "surface tension."  When you drop Mentos into the soda, the surface tension is broken and bubbles are released.


The kids also had fun with the law of gravity again - jumping in a blowup (rented) Jumpy House. 


When the party was finished each child took home a pair of safety glasses, an apron, a name tag, a lab book, a ruler, a lava lamp, and an experience they LOVED!

Sunday, August 18, 2013

Inspirational Garden Sign

A good friend of mine gifted me with a garden arbor he built .  Needless to say, I LOVE it!  I placed it at the entry of my garden where it welcomes friends and family while supporting some of my favorite flowering vines.  This summer I added an inspirational hand made sign I found at a church thrift sale. 


I assume the writer was referring to LOVE and marriage but it also reminds me of my relationship to God. 

My love for You is a journey
Beginning at forever and ending at never

Sunday, August 4, 2013

Painted Stones

My friends LOVE painting rocks.  They also LOVE the search.  Finding the right size, shape, and smoothness can be quite an adventure.  It's so fun to see them turn simple river stones into beautiful creations.  It's also fun when I'm gifted with one of their treasures.  Thanks, friends, for sharing!

This is what they did:


  1. They chose a stone for each critter.
  2. They followed instructions from The Art of Painting Animals On Rocks by Lin Welford.
  3. They added their own personal touches using acrylic paint, brushes, and even toothpicks for small detail.
  4. They sprayed their critters with clear acrylic paint to preserve the finish and make them weather resistant.
My friend's granddaughter also collected rocks and painted a few of her own.  They weren't as detailed as the ones shown above but they were unique and colorful.  She enjoyed a fun filled afternoon and had her own personal treasures to take home to show her family.  I placed my "ladybug rock" in my garden and LOVE, LOVE, LOVE it!

A Star Of Sticks

Nature offers many gifts of beauty.  Fallen birch branches are one.  I LOVE  that they can be used for wonderful, unique projects, and are often "free for the taking!"  With a little wire, a cutter, and a few birch sticks, I created a hanging star for my door.


This is what I did:
  1. I made a paper template of a star.  Mine measures 14" x 14".
  2. I cut birch branches to fit within my template.
  3. I wired them together with 9 gauge wire.  You can also tie them with fish line.
  4. I attached a wire hanger.
I've seen a similar craft of painted sticks in a heart shape but I preferred to keep mine natural.  Older kids who are able to twist and/or tie will have fun creating shapes of their own!


Friday, July 5, 2013

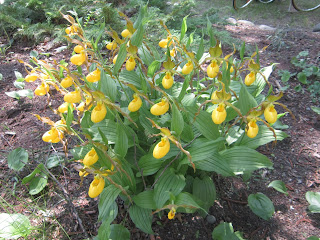
Yellow Lady's-Slipper, Orchid Family

I LOVE flowers so when I spotted these beauties while camping "up north" in June, I snapped a few quick photos to pass along and share.  


Glittering Sun Catchers

My friends and I LOVED making these glittering sun catchers.  It was a fun camping project that my friend shared with us one cloudy afternoon while sitting around the campfire.  After a quick refresher course on tying fish knots, we were ready to get started.  Even though the fish in the lake weren't biting, this lucky catch was quite a trophy!

This is what we did;


  1. We found birch branches to hang our strings of beads.
  2. Starting at the bottom, we tied fish line to a large bead leaving enough line to make strands of various lengths and to later tie them to the birch branch.  We added a small bead between larger beads to help separate them and make them stand out.
  3. We added a wire hanger and hung them in the sun! 
So, so pretty!  You'll LOVE these as much as we do.

Easy Frosted Glass Containers


My friends and I LOVE camping.   We also LOVE the opportunities it brings to make crafts together.  Sharing ideas and supplies go hand in hand as we put our creative minds to work.  We started out this camping season making sprayed glass containers.  My friend decorated a pretty vase for her "soon to be born" granddaughter and I made a frosty container to set in my bathroom.

This is what we did:


  1. We decorated glass containers with stickers (shapes and letters) and rubber bands. You can use letters to write a message or personalize one with a name.  
  2. We lightly sprayed the containers with Frosted Glass.  Two coats worked best.
  3. When completely dry we carefully removed the stickers and rubber bands.


Friday, June 21, 2013

Painting Sticks!

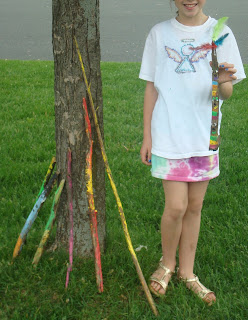
My kids LOVE to collect sticks on walks or in the backyard.  Usually they end up being used as some type of sword to "fight the dragons" but today...they became works of ART!  It was a fun project.

This is what we did:


  1. We collected dry sticks of all sizes.
  2. We painted the stick using acrylic paint.
  3. Big Guy and Little Guy went for quantity.  The girls went for quality!
  4. The girls added feathers using tacky glue.
The project took us about 30 minutes.  Acrylic paint will stain clothes.  Be sure to wear "play" clothes.  Little Guy was covered in paint.  The paint  washes off skin with some scrubbing.  I think we'll put the sticks in our garden.  Aren't they cute? :)

Tuesday, June 4, 2013

Better Alternative Science Projects for Kingdom Rock VBS!

I put more thought and TESTING into the science projects since my original post for alternative science experiments for Imagination Station, Kingdom Rock VBS.   I think this is what I am going to do instead of the previous ideas I blogged about:

Day 1:  Stand Strong in God's Love

This is so super cool.  I tested it with my 2.5 yr. old son.  He loved it and I think it will wow and amaze the older kids too.  You just need to try it!

Oobleck Egg Drop: 
 DO NOT PUT THIS SOLUTION DOWN the DRAIN!  IT WILL CLOG!
In a disposable baking tin, mix:  2 cups cornstarch with a little over 1 cup of water using your hands.  This forms the weirdest mixture.  It is a solid and a liquid at the same time!  I know, weird.  This recipe is all over PINTEREST.   The kids can put their hands in it and just play with it.  Then, POUR it in a Ziploc bag.  Put a RAW egg into the mixture.  It will float.  Have a child stand on a chair, hold the bag above his/her head and DROP itThe Egg will NOT BREAK!  You can even throw the bag on the lawn.  The bag will rip before the egg breaks!  I'm completely serious.  I tried it myself!

Here is a video explaining Oobleck:
How to Make Oobleck Video

I think this activity is best done outside so that you can clean the kids' hands using a hose.  It's messy.  If a bag broke inside, it would be a big mess too!

The message:  God loves us and is our protector.  Love is mushy and soft but it is also strong.  The oobleck is soft (liquid) but does not allow the egg to break (strong).

We finished this activity at VBS.  It was a huge hit!  Next time, I will put down plastic tablecloths.  It was a pain trying to wash the tables without the use of a hose. 

Day 2:  Family and Friends Help Us to Stand Strong:

I tested this activity with my five year old.  He was able to do it but struggled.  It will be beneficial to him to be in a group with older kids.

PLAY-DOH and STRAW building TOWERS:
The kids will be challenged to work in their crews to build a tower as tall as the tallest person in the crew!  They will get play-doh to use as a base and then a huge bunch of drinking straws and masking tape.  Then, they just build.  It would be cute with a crew flag attached to the top of the tower.


This picture is a little deceiving.  The tower was not as tall as the doorway!
 
 
Does anyone need a play-doh recipe?  I can add one, if needed.

The message:  Your friends and family are your support in loving and relying upon God.  You are stronger when you have God-loving friends and family.  The tallest towers have a strong base (big play-doh ball and several straws).  The base keeps the tower from falling.  Your friends and family keep you strong-keep you from falling.

The kids did a super job with this activity!  Every group completed it differently.  We walked around with tape measures to help encourage the kids.  This was one of our favorites!

Day 3:  Prayer Helps you to Stand Strong:

Everybody loves bubbles.  This activity will use something everyone loves to teach about prayer. I'm going to set up several bubble stations with different solutions and wands out on the lawn.  My favorite station is the bouncing bubbles.

Bouncing Bubbles:
Mix 1 cup of distilled water with 1 Tablespoon Dawn dish soap (don't use anti-bacterial) and 1 tsp of Glycerin (I bought mine at a Walmart Pharmacy).  Let it sit over night.  Have the kids put a clean sock or glove on one hand.  Blow bubbles.  The kids can gently catch a bubble in the gloved hand and gently bounce it up and down.  This is a good bubble solution.  I made it this evening and tried it out with my kids.  It didn't work as well as it shows on the video BUT I didn't let it sit over night.

Video from Steve Spangler Science:
Bouncing Bubble Video

The message:  God wants us to pray for big things and little things. God doesn't care what we pray for or how we pray. He just wants us to talk with him, to pray.   Prayer helps us to stand strong.  The bubbles are different shapes, sizes, and strengths.  They represent everything God wants us to pray for or about.

I ended up making about 15 gallons of bubble solution.  I used hose water (not distilled) and Dawn dish soap.  I added glycerin but not nearly as much as the recipe called for.  Next time, I won't add any glycerin.  It is $3.88 for 6 ounces at Walmart!  I made the bubble solution in my cooler that has wheels to make it easy to transport.  We were outside, so we only made three kinds of bubbles:
1)  Snake bubbles:  Poke a hole in the bottom of a Solo cup and insert a straw.  Put a wash/dish cloth around the open end of the cup and secure it with a rubber band.  Kids blow into the straw and a long snake of bubbles is created!
2)  Bubbles on the table surface:  Use a sponge or cloth to get the table wet with bubble solution.  Dip the end of the straw into the bubble solution.  Blow gently on the straw (close to the table) and you will get bubbles on the table.
3) Bubble Wands:  I bought a variety back of 27 bubble wands at Walmart for about $6.00.

This activity was a huge success.  It took quite awhile to clean up (30 minutes). The kids did get wet but not soaking.  They loved it and could have played longer.

Day 4:  Trusting God helps us to Stand Strong:
This activity is going to be a lot of fun.  I tested it in my bathroom that doesn't have windows.  I was worried that it would be too dark and the kids would be scared.  We could actually see quite well.  Kids won't be afraid.

Black Light Painting:
I purchased 60 watt Halogen Black Lights at Walmart ($4.97 each).  I'm going to shop the Dollar Bin at Target or the Dollar Store to find glow bracelets and/or necklaces.  I'm also going to get neon washable paint.  I will set up a black light (using a regular lamp without a shade) on a table for each crew.  I will ask the kids to paint a picture of God or a prayer that God has answered or a prayer that they would like God to answer.  Under the black lights their pictures will be illuminated.  The glow bracelets are just an added wow factor.

The message:  Even though we can't always see God - He is there.  If we trust that God is with us, we will stand stronger.  Our pictures will be better illuminated under the black lights.  That represents our trust in God.

I ended up NOT painting.  I didn't think it would be worth the mess.  Instead, we did three other things:
1) We made Trust bracelets:  We used NEON bendy things with NEON pony beads.
2) We made Trust cards:  The kids drew a picture with regular markers on a NEON index card.  It was a picture of "Trusting God".
3) Finally, each kid got a NEON or WHITE balloon to play with under the black lights.

Glow in the Dark doesn't work under Black Lights.  It needs to be NEON!

We aren't going to have a Day 5 at Imagination Station - so I only have four days!  Let me know if you come up with something great that I could use!  :)