01 09 10

Friday, April 11, 2014

Good Friday Craft

We made this picture in Sunday School for our Good Friday lesson.  It turned out beautiful and it was super easy to make.

This is what we did: 


  1. I folded a piece of black paper in half.  I drew the outline of a hill and a cross and a half.
  2. The kids cut out the hill (Mt. Calvary) and the cross.
  3. The kids used water color paints to make the background on white cardstock paper.
  4. The kids glued the outline of Mt. Calvary onto the paper.  Some of the kids used vibrant paints and others chose more subdued colors.  Both looked very beautiful.


Sunday, March 23, 2014

The Triumphal Entry - Palm Sunday Lesson Plan with Craft

We celebrated Jesus' Triumphal Entry into Jerusalem today at Sunday School.  The lesson was a huge success.  The kids learned a lot, had a ton of fun, and hopefully experienced the LOVE of our Risen Savior!!

This is what we did:

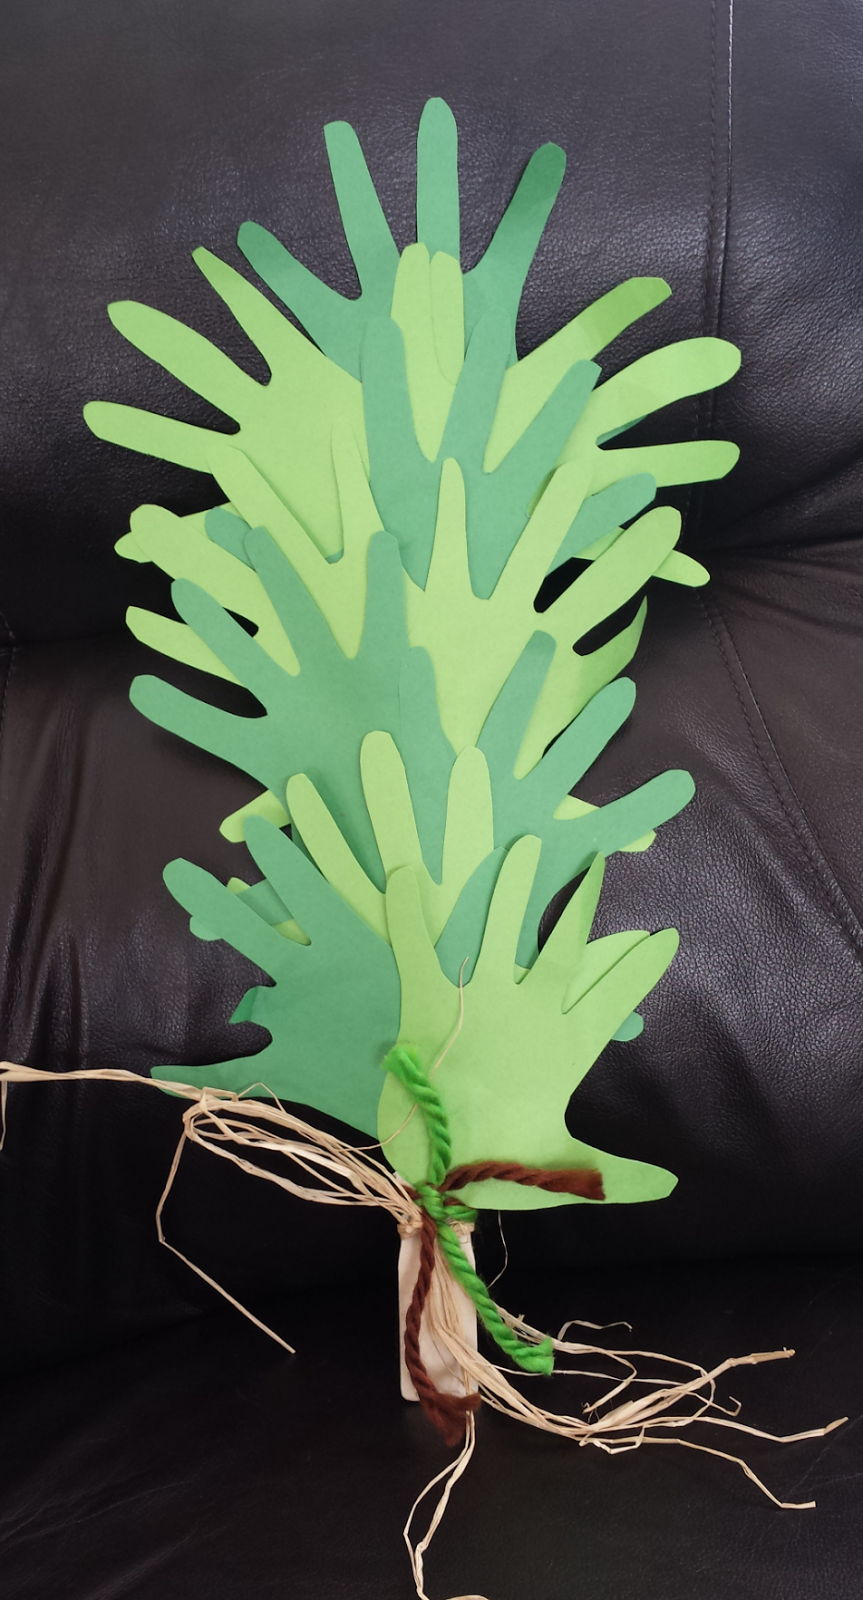
1.  We started the lesson with the students entering the room and coloring a picture of Jesus's Triumphal Entry.  While the students colored, a teacher traced the "Palm" of each child's hand and cut out several copies for each child  (about a dozen per kid!)

This is a link to many coloring pages of the Triumphal Entry:  Coloring Pages

2.  I read a book to the kids:  The Donkey That No One Could Ride


3.  The kids made a palm branch craft:  


*  We used donated stir sticks from Sherwin Williams. I tied raffia (purchased at Walmart) and contrasting green and blue jumbo yarn on the notch at the end of each stir stick to add decoration.

*  The kids glued their "palms" onto the stir stick.  I put glue on paper plates and gave each child a q-tip to use as a glue applicator.  

3.  I read the bible story of the triumphal entry and the students acted it.  They kids made a parade behind "Jesus" and the "Transformed Donkey".  My parents made the donkey in the picture below.  (Tutorial to Come!)


Thursday, March 20, 2014

Dinosaur Craft

Little Guy and Best Buddy requested a dinosaur project!  It was super simple and turned out really cute.  I LOVE the imaginary play that took place after we finished.

This is what we did:  


  1. I drew the outline of a dinosaur's body onto a piece of cardboard and cut it out.
  2. The boys painted the outline with washable tempera paint.
  3. I traced an outline of the top of the body so that I could draw spikes (triangles) and I cut it out.
  4. The boys sprinkled glitter on the dinosaurs while the paint was still wet.
  5. The boys glued the spikes onto the dinosaur.
  6. The boys glued a googly eye onto the dinosaur.
  7. They painted two clothespins each the same color as the dinosaur to use as legs.
  8. Attach the clothespins to the legs and let it dry.
  9. Play!
This project took about a half hour from start to finish.  If the materials had been pre-drawn and cut it would've taken less time.  The boys worked on this project while I made chocolate chip cookies!  Have fun!

Tuesday, March 18, 2014

An Easter Project

I LOVE flowers, especially in Spring, so when March rolls along I look forward to Ash Wednesday - the beginning of Lent.  It is then that I dig out my amaryllis bulb, pot it in fresh soil, give it water, and place it in the sun.  I continue to water it throughout Lent and wait for Easter's arrival, the time it typically takes for my bulb to sprout and bloom.  It is so easy that kids can do it!  After planting, they WAIT, and watch "new life in Spring."


If you plan ahead, you can purchase amaryllis bulbs during Christmas time.  They are available at several stores and I have found them for as little as $5.00 each.  Otherwise you can find them at Bachman's but expect to pay more. 

Thursday, March 13, 2014

Crown Of Thorns Plant

I LOVE going to thrift stores and garage sales.  Last summer I bought a succulent called "Crown of Thorns" for just a few dollars.  After a little research from Wikipedia, I learned that my plant is native to Madagascar and is in the family Euphorbiaciae.  It is believed by many to be the plant worn by Jesus Christ at His crucifixion.  The plant is also referred to as Christ Plant and Christ Thorn.  During this time of Lent, it is a good reminder to me of Christ's sacrifice for our salvation.


Euphorbia milii


NOTE:  If you purchase this plant for yourself, please be aware that the sap is "moderately poisonous" although I have not noticed any sap on mine.  You should also use caution when handling as the thorns are quite pronounced. 

Friday, December 20, 2013

Kids Fresh Green Centerpiece

Christmas is a time of celebration, great joy, and wonder.  It's also a time to exchange gifts of LOVE to our family.  What gift expresses more LOVE than a gift made by a child!


My daughter, grandkids, daycare kids, friend, and I made these simple arrangements at their special Christmas Party today!

This is what we did:
  1. We wrote each child's name on the bottom of an 8 oz. plastic cup.  You can use clear cups or cups with a printed design.
  2. We instructed the kids to turn their cups upside down and place a rubber band on each.
  3. We then gave them a 22" piece of jute yarn and told them to slip it under the rubber band.  (The rubber band helps hold the jute in place).
  4. If the kids were able to tie, they were instructed to wrap the jute around the cup and make a simple bow.  Because our group was preschool age, the adults did this part for them.
  5. The kids turned their cups right side up and placed a pre-cut piece of wet foam in each.  The foam was cut approximately 2 1/2" high and 1 3/4" wide.  Each fit snuggly to the bottom.
  6. The kids then poured about 1/2 cup of water onto their foam.  If they saw water that was not absorbed into the foam, they were told they had too much water and the extra water was dumped out.
  7. The kids then stuck small pieces of fresh greens (also pre-cut) into the wet foam leaving a space open in the center.
  8. They finished by sticking a decorated pick in the center. Any holiday pick will work or a simple pinecone on a stick as shown in the photo above.
It was fun to see the kids accomplish this activity with little or no help.  With minimal prep work, the kids completed the craft in only 10-15 minutes.  They looked quite proud of their accomplishment as they posed for photos in front of the Christmas tree!

Friday, December 6, 2013

Clay Dough Hand Print

I've been wanting to make a hand print keepsake for "Little Guy" for the longest time.  When Big Guy was small, his daycare provider, made the cutest framed glitter hand print and gifted it to me at Christmas time.  That was FOUR years ago!  Today, I finally made one for Little Guy.  I LOVE it.  We made one for Best Buddy too.

This is what we did:


This is a fairly simple project, but it did take all day to make due to drying time.

1.  Make the clay-dough:  2 cups baking soda, 1 cup cornstarch, 1 1/2 cups of water.
Mix the ingredients in a big pot over medium heat and stir.  You need to stir for several minutes. Once your mixture thickens (looking like mashed potatoes), dump it onto wax paper, cover with a damp cloth and let it cool.

2.  Form your shape.
Sprinkle your wax paper with cornstarch and roll out your dough.  The more you work it with your hands first, the softer it becomes and fewer cracks in the dough.  If you notice the dough cracking, sprinkle more corn starch and continue to use your rolling pin to smooth it out.

3.  Make your Hand Print.
Press the child's hand in the center of the dough.  Make sure you have a good indentation by pressing on each part of the child's hand.

4.  Dry in the oven.
Place the dough on a cookie sheet and bake it at 250 for about 3 hours. Let it cool completely.

5.  Sand any rough spots.

6.  Paint the hand print any color.
We painted the hand first.  The kids were able to stay in the lines fairly well (3 yrs. old).  We chose to use black on the outside to cover up where they went out of the lines with the red.  Sprinkle with glitter (if you want).  Let it dry completely.  Write the child's name and year on the front with a metallic paint pen.

7.  Spray with a clear gloss finish.
Let it dry.  Display somewhere beautiful!

 
My inspiration came from Pinterest:  Christmas Tree Ornaments  She does a really great job explaining how to make the clay dough.  She has really cute ideas for decorations for the tree.  We might try those next :)