01 09 10
Showing posts with label Sunday School Lessons. Show all posts

Monday, October 6, 2014

The Creation Story - Sunday School Lesson!

The Creation Story - Sunday School Lesson

To teach the "Creation Story" we did many activities.

1.  Students entered the room and colored a picture of the Creation Story.  We also had large rocks set at each child's spot to paint with water.

2.  The students met in a large group and sang a song about Creation.  (song lyrics to come)

3.  We read the Creation Story from a Children's Bible.  Then we gave each child a picture of something God created. The kids each came forward and placed the picture under the correct day;  day 1, day 2, etc...  After each picture was placed, the class said, "It was Good!"

4.  The children ate a snack.  We provided the kids with a couple of cheese cubes and pretzel sticks. We showed the kiddos how to make a sun by pushing the pretzel sticks into the cheese cube.  We explained that God made LIGHT!  The kiddos had a lot of fun with this activity and started to make other things too!

5.  While the children ate the snack we asked them to tell us different things that God made.  We ended up naming a lot of different animals and making animal sounds.

6,  We had the kids make a "CREATION" bucket.  Each kid got a gallon-sized ice-cream bucket that had been covered in scrap book paper and mod podge.  Then they decorated the buckets with stickers.  The stickers represented all the different things that God made.  The kids will use their bucket to carry their Sunday School Creations home each week.


7.  Finally, we said our closing prayer.  Each child thanked God for one thing He created.

This class was taught to 4 yr. olds.

Wednesday, May 7, 2014

Alternative Science Experiments for Weird Animals VBS - Imagination Station

I'm in charge of Imagination Station at VBS this June.  These are the ideas I came up with to fit with the themes of each day.  The theme and the ideas don't belong to me.  Please check out the links to learn how to do each activity!  I also have a Pinterest board labeled "Weird Animals VBS".

Day 1:
Even when you're left out, Jesus Loves You.
"I am with you always, even to the end of the age"

Activity:  Gak

Get Directions at this link:

The recipe for this Gak is makes  larger quantity than the link above.  We used washable paint instead of food coloring.
Supplies:
- Elmer's School Glue
- Borax
- Clear Plastic Cups (2/child)
- Water
-  Food Coloring (optional)
- Ziplock Bags (to take home the GAK)

Connection:  Gak has a really unusual texture.  No matter how it is manipulated, it stays together (bends, forms, stretches, blows bubbles).  No matter if you feel left out or different from others, God is always with you – no matter your circumstance.

We have completed this project.  This is what I recommend:
- use tablecloths.
- provide the gak for preschoolers - they were too hesitant to touch it so the process of making it wasn't worth the work.  K and older LOVED it!
- We used gallon jugs of Elmers glue.  (Must be Elmers).  The recipe I used was 4 oz of glue, 4 oz of warm water, mixed with a few drops of liquid watercolors.  Then mix 1 tsp Borax with 4 oz of warm water.  Dump together and start mixing - USE YOUR HANDS!  I made a measuring cups (marking only 4 oz) with clear plastic cups.  The cups were pretty gross by the end (5 groups of 30 kids) but it didn't matter.  It worked.  That was way better than using measuring cups.
- We made the Gak in disposable dollar store punch bowls.  We threw them away when finished.
- Gave the Gak to kids on the way out the door.  We didn't want it all over the church building.
Super Fun activity.  Big Hit!

Day 2:
Even though you're different, Jesus Loves You.
"For we are God's masterpiece.  He has created us anew in Christ Jesus"

Activity:  Self- Portrait

Get Directions at this link:

Supplies:
- Mirrors or picture of themselves
-  Elmers Glue
- black cardstock
- colored drawing chalk
- hairspray to set the chalk


Connection:  (I think we should actually face paint for this one instead of drawing self-portraits).  Everyone looks different but we are all created in His image, beautifully.

wet wipes take off face paint really well!


Day 3:
Even when you don't understand, Jesus Loves You.
"Do to others as you would like them to do to you"

We finished this project.  This is what I recommend:
- We used face paint and tattoos.
- The kids each had their own mirror.  We had a bunch at the church (not sure why).  Each mirror said:  "Rogain Works".  Ha! :)
- Use tablecloths for easy clean up.
- Kids painted their own faces and crew leaders painted kids too.
- Have lots of wet wipes handy!
- wet 1/4 of sponge with water and set in a bowl.  The kids can get the facepaint wet on the sponges.
Super Fun activity.  They painted happily for 30 minutes.  Even (most of) the preschoolers loved it!

Activity:  Color Spray T-shirt

Get Directions at this link:

Fun way to color a shirt {Preschool craft}
These pictures are from Kid Activities Blog.  They are not my own.

Supplies:
- White cotton t-shirt (Can the kids each bring their own?)
-  permanent markers
-  spray bottles
-  rubbing alcohol


Connection:  Permanent markers are supposed to be forever.  The alcohol makes the colors run together.  That doesn’t make a lot of sense.  But, the colors are beautiful.  (Jesus’ love for us).  Also, our actions impact others.  (colors running into other colors)

Here are a couple of links to order t-shirts online:
http://www.shirtchamp.com/shopping/basket.cfm

$1.94/shirt:)   Sizes XS-XL

http://www.theadairgroup.com/kids-shirt-white-p-232.html?osCsid=9dba5a4b71a8005d9f74f3a68c8f64d8

$1.89/shirt....same sizes

http://www.walmart.com/ip/Hanes-Boys-Short-Sleeve-Crew-Tees-5-Pack/5634302?action=product_interest&action_type=title&placement_id=irs-srp-1&strategy=PWVAV&visitor_id=76360229508&client_guid=0553af0b-4feb-4017-87fe-6af4d8567a1c&config_id=8&parent_item_id=17164044%2C36723292%2C34717222%2C36058683%2C36058443%2C36058668%2C23704279%2C23704278%2C23704281%2C23704280%2C23704282%2C19341981%2C35898724%2C35897939%2C35284780%2C34118580&guid=8f1a5c79-8078-498c-aa9e-549073a8a7a3&bucket_id=irsbucketdefault&findingMethod=p13n

$1.89/shirt.....Hanes 5 pack at Walmart

We have completed this project. This is what I recommend:
- Use the fat, new sharpies.  The color seemed to be much brighter and spread much more.  
-  Do this activity outside, especially if you have a large group.
-  If doing this activity with pre-schoolers use spray bottles that have a trigger.  They are easier to operate.

Day 4:
Even though you do wrong, Jesus loves you.
"  God loves us and sent his Son as a sacrifice to take away our sins."

Activity:  Ice-Cream in a Bag

Get Directions at this link:

Tips for Making Ice Cream in a Bag
This image is a product of Coffee Cups and Crayons.  It is not my own.


Supplies:
- half and half
- sugar
- vanilla
- quart size ziplock bags
- gallon size ziplock bags
- ice
- ice-cream/rock salt

We have completed this project.  This is what I would recommend:
- Give yourself a lot of time for this activity.  I completed it in about 6 minutes at home.  When we did it with groups of 30 it took closer to 25 minutes.  
-  Make sure you do this activity outside.  We had to do it inside because of rain and it was too messy.  I wouldn't do it again.
-  This was an absolute favorite among the kiddos.
- Consider having the kids pair up.  It was a lot of shaking.  We used pairs for one of the groups and it was much better.
-  Make sure you use name brand bags.  You need really high quality otherwise the salt permeates through the plastic making a VERY DISGUSTING SALTY flavored ice-cream.
-  Have gloves available for the kiddos.  The ice-cream gets super cold!

Connection:  The rock/ice-cream salt represents our sins – it doesn’t taste good and it can’t be eaten.  Through Jesus' sacrifice on the Cross (shaking the bag) we are redeemed by Christ.  God always forgives and makes us new through Him.  (product is yummy ice-cream)


Friday, April 11, 2014

Good Friday Craft

We made this picture in Sunday School for our Good Friday lesson.  It turned out beautiful and it was super easy to make.

This is what we did: 


  1. I folded a piece of black paper in half.  I drew the outline of a hill and a cross and a half.
  2. The kids cut out the hill (Mt. Calvary) and the cross.
  3. The kids used water color paints to make the background on white cardstock paper.
  4. The kids glued the outline of Mt. Calvary onto the paper.  Some of the kids used vibrant paints and others chose more subdued colors.  Both looked very beautiful.


Sunday, March 23, 2014

The Triumphal Entry - Palm Sunday Lesson Plan with Craft

We celebrated Jesus' Triumphal Entry into Jerusalem today at Sunday School.  The lesson was a huge success.  The kids learned a lot, had a ton of fun, and hopefully experienced the LOVE of our Risen Savior!!

This is what we did:

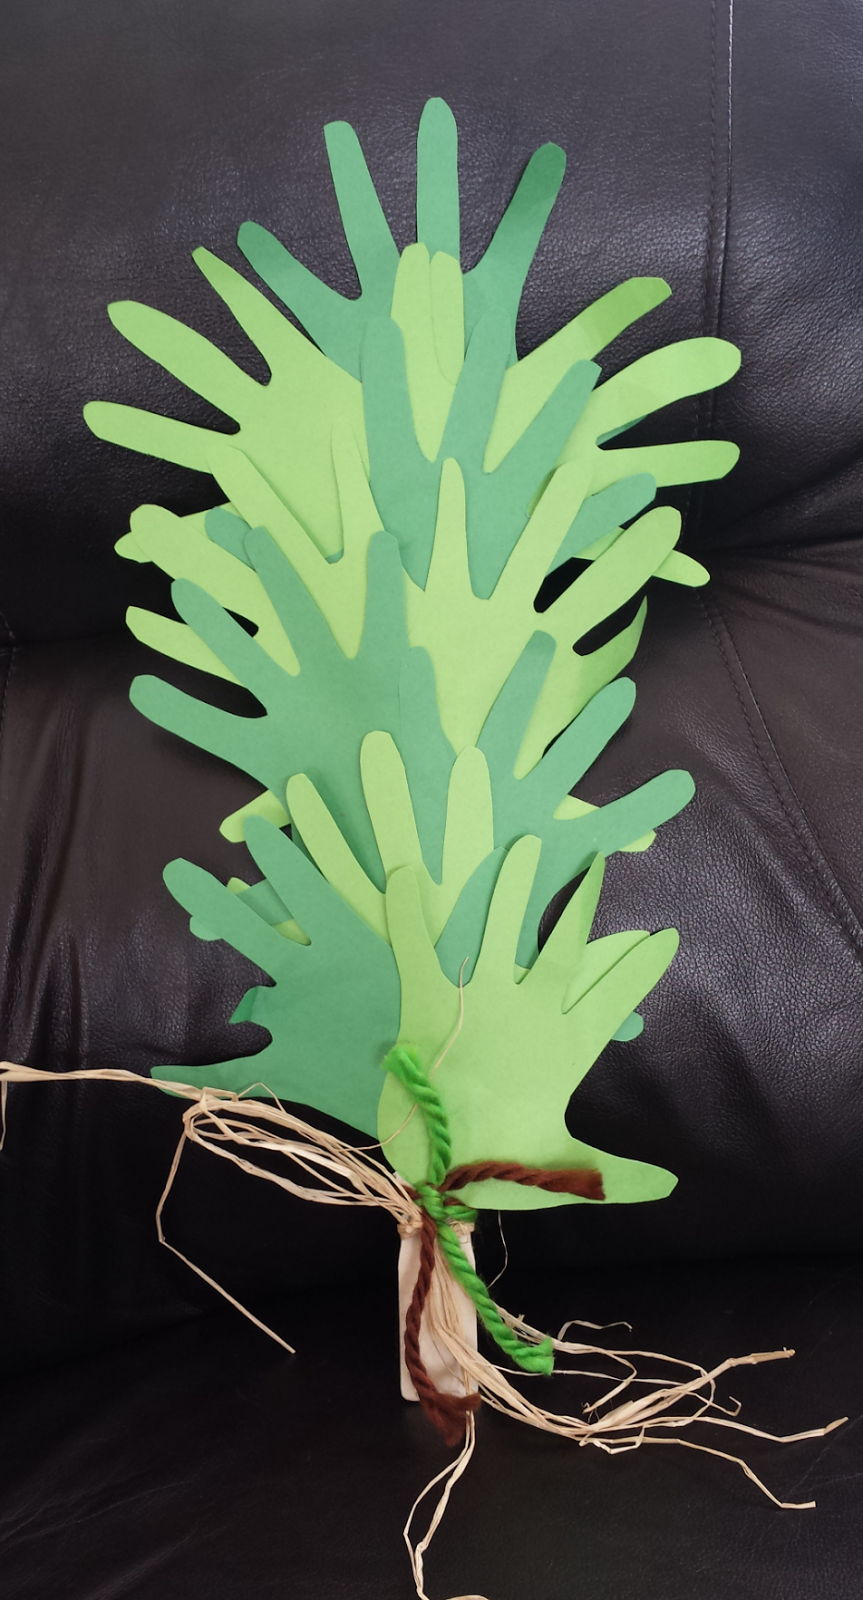
1.  We started the lesson with the students entering the room and coloring a picture of Jesus's Triumphal Entry.  While the students colored, a teacher traced the "Palm" of each child's hand and cut out several copies for each child  (about a dozen per kid!)

This is a link to many coloring pages of the Triumphal Entry:  Coloring Pages

2.  I read a book to the kids:  The Donkey That No One Could Ride


3.  The kids made a palm branch craft:  


*  We used donated stir sticks from Sherwin Williams. I tied raffia (purchased at Walmart) and contrasting green and blue jumbo yarn on the notch at the end of each stir stick to add decoration.

*  The kids glued their "palms" onto the stir stick.  I put glue on paper plates and gave each child a q-tip to use as a glue applicator.  

3.  I read the bible story of the triumphal entry and the students acted it.  They kids made a parade behind "Jesus" and the "Transformed Donkey".  My parents made the donkey in the picture below.  (Tutorial to Come!)


Saturday, November 16, 2013

Holy Spirit/Dove Project

Our lesson at Sunday School was about the Holy Spirit.  The objective was to help the kids understand that Jesus sent the Holy Spirit to be with us on Earth.  The Holy Spirit helps us to:  1)  Do what God wants us to do  2)  Do what is Right  3)  Help Others  4) Pray.  The concept of the Holy Spirit can be difficult for little people to grasp because the Holy Spirit can not be seen.  We did a couple of activities during our lesson to help them out.

This is what we did:

Mystery Picture Craft:


  1.  Draw a simple dove outline, using a white crayon, onto white paper.  Make the outline fairly thick.  I drew over my outline a couple of times. 
  2. Draw an olive branch in the Dove's mouth.  I used a brown crayon for the branch and a green crayon for the leaves.
  3. The kids could only see the olive branch when they were given the paper.
  4. I instructed the kids to use watercolor paints to cover the entire page.
  5. The mystery picture;  THE DOVE shows up.
This project was completed very quickly by 5 yr. olds.  I think it took about 10 minutes.  It is a beautiful project for the kids to take home.  I'm guessing many parents hung it at home.

Dove Paper Plate Craft:


  1. I drew an outline of a dove on a paper plate.  Use the really cheap flimsy paper plates.  My plate was a little bit higher quality and it made it more difficult for the kids to cut out the pieces.
  2. Let the kids cut along the lines.
  3. Tape the wings to the back side of the body.
  4. Let the kids draw the details (beak, feet, eyes)  We used crayons.
I think it would be fun to use google eyes and white feathers too! 

This idea came from:  Catholic Icing
 
Additional Activity: 
 
I also used our puppet, Scotty the Lion, to help introduce the kids to the concept that just because you can't see something doesn't mean it doesn't exist.  I put a balloon in Scotty's bag and had the kids try to guess what was in it.  Most guessed it was a ball.   The balloon grabbed their attention right away.  I took out another balloon and tried to "blow it up" without actually blowing.  I just put it to my lips.  The kids told me I needed to blow in order for it to work.  We then talked about air - even though we can't see it, it exists, and is actually very powerful.  An example of powerful air is a storm or a tornado.  This is like the Holy Spirit.  We then tossed the balloon to each other and gave examples of what the Holy Spirit can help us to do. 


Wednesday, October 9, 2013

Candy Necklace - How sweet are YOUR words!

I was looking for a quick and easy craft project for a few moms to complete as a "filler" at a MOM's Group meeting.  I found this idea on Pinterest:  Candy Necklace.  It only took minutes to complete, is super cute, and our kids LOVED them!

  This is what we did:


  1. Tear off a piece of cling wrap.  Long enough to hold about 5 pieces of candy. (The longer the cling wrap, the longer the necklace).
  2. Lay the cling wrap on a hard surface.  Fold it in half (the long way).
  3. Lay 5 pieces of wrapped candy down the center of the cling wrap.
  4. Fold one side over the candy and then the other.
  5. Cut 6-8 inch strips of curling ribbon to tie in between the pieces of candy.  
  6. Cut a longer strip of curling ribbon to tie at each end to connect the necklace.
  7. Curl the ribbon.
  8. Add the Bible verse:  Psalm 119: 103
The above link has very clear directions.  You should check out her site.  I did make a couple variations to her project.  I used less candy (less expensive) and I added the Bible verse. 

 The kids really love the candy necklaces.  I imagine there are hundreds of reasons to make these necklaces.  Big Guy and Little Guy made a couple for their friends, just because...  Since there is tying involved I had to help Big Guy and Little Guy a lot.  I'm sure older elementary kids could do the entire project by themselves.  My boys loved picking out the candy to include in the necklace.  Have fun!

Tuesday, June 4, 2013

Better Alternative Science Projects for Kingdom Rock VBS!

I put more thought and TESTING into the science projects since my original post for alternative science experiments for Imagination Station, Kingdom Rock VBS.   I think this is what I am going to do instead of the previous ideas I blogged about:

Day 1:  Stand Strong in God's Love

This is so super cool.  I tested it with my 2.5 yr. old son.  He loved it and I think it will wow and amaze the older kids too.  You just need to try it!

Oobleck Egg Drop: 
 DO NOT PUT THIS SOLUTION DOWN the DRAIN!  IT WILL CLOG!
In a disposable baking tin, mix:  2 cups cornstarch with a little over 1 cup of water using your hands.  This forms the weirdest mixture.  It is a solid and a liquid at the same time!  I know, weird.  This recipe is all over PINTEREST.   The kids can put their hands in it and just play with it.  Then, POUR it in a Ziploc bag.  Put a RAW egg into the mixture.  It will float.  Have a child stand on a chair, hold the bag above his/her head and DROP itThe Egg will NOT BREAK!  You can even throw the bag on the lawn.  The bag will rip before the egg breaks!  I'm completely serious.  I tried it myself!

Here is a video explaining Oobleck:
How to Make Oobleck Video

I think this activity is best done outside so that you can clean the kids' hands using a hose.  It's messy.  If a bag broke inside, it would be a big mess too!

The message:  God loves us and is our protector.  Love is mushy and soft but it is also strong.  The oobleck is soft (liquid) but does not allow the egg to break (strong).

We finished this activity at VBS.  It was a huge hit!  Next time, I will put down plastic tablecloths.  It was a pain trying to wash the tables without the use of a hose. 

Day 2:  Family and Friends Help Us to Stand Strong:

I tested this activity with my five year old.  He was able to do it but struggled.  It will be beneficial to him to be in a group with older kids.

PLAY-DOH and STRAW building TOWERS:
The kids will be challenged to work in their crews to build a tower as tall as the tallest person in the crew!  They will get play-doh to use as a base and then a huge bunch of drinking straws and masking tape.  Then, they just build.  It would be cute with a crew flag attached to the top of the tower.


This picture is a little deceiving.  The tower was not as tall as the doorway!
 
 
Does anyone need a play-doh recipe?  I can add one, if needed.

The message:  Your friends and family are your support in loving and relying upon God.  You are stronger when you have God-loving friends and family.  The tallest towers have a strong base (big play-doh ball and several straws).  The base keeps the tower from falling.  Your friends and family keep you strong-keep you from falling.

The kids did a super job with this activity!  Every group completed it differently.  We walked around with tape measures to help encourage the kids.  This was one of our favorites!

Day 3:  Prayer Helps you to Stand Strong:

Everybody loves bubbles.  This activity will use something everyone loves to teach about prayer. I'm going to set up several bubble stations with different solutions and wands out on the lawn.  My favorite station is the bouncing bubbles.

Bouncing Bubbles:
Mix 1 cup of distilled water with 1 Tablespoon Dawn dish soap (don't use anti-bacterial) and 1 tsp of Glycerin (I bought mine at a Walmart Pharmacy).  Let it sit over night.  Have the kids put a clean sock or glove on one hand.  Blow bubbles.  The kids can gently catch a bubble in the gloved hand and gently bounce it up and down.  This is a good bubble solution.  I made it this evening and tried it out with my kids.  It didn't work as well as it shows on the video BUT I didn't let it sit over night.

Video from Steve Spangler Science:
Bouncing Bubble Video

The message:  God wants us to pray for big things and little things. God doesn't care what we pray for or how we pray. He just wants us to talk with him, to pray.   Prayer helps us to stand strong.  The bubbles are different shapes, sizes, and strengths.  They represent everything God wants us to pray for or about.

I ended up making about 15 gallons of bubble solution.  I used hose water (not distilled) and Dawn dish soap.  I added glycerin but not nearly as much as the recipe called for.  Next time, I won't add any glycerin.  It is $3.88 for 6 ounces at Walmart!  I made the bubble solution in my cooler that has wheels to make it easy to transport.  We were outside, so we only made three kinds of bubbles:
1)  Snake bubbles:  Poke a hole in the bottom of a Solo cup and insert a straw.  Put a wash/dish cloth around the open end of the cup and secure it with a rubber band.  Kids blow into the straw and a long snake of bubbles is created!
2)  Bubbles on the table surface:  Use a sponge or cloth to get the table wet with bubble solution.  Dip the end of the straw into the bubble solution.  Blow gently on the straw (close to the table) and you will get bubbles on the table.
3) Bubble Wands:  I bought a variety back of 27 bubble wands at Walmart for about $6.00.

This activity was a huge success.  It took quite awhile to clean up (30 minutes). The kids did get wet but not soaking.  They loved it and could have played longer.

Day 4:  Trusting God helps us to Stand Strong:
This activity is going to be a lot of fun.  I tested it in my bathroom that doesn't have windows.  I was worried that it would be too dark and the kids would be scared.  We could actually see quite well.  Kids won't be afraid.

Black Light Painting:
I purchased 60 watt Halogen Black Lights at Walmart ($4.97 each).  I'm going to shop the Dollar Bin at Target or the Dollar Store to find glow bracelets and/or necklaces.  I'm also going to get neon washable paint.  I will set up a black light (using a regular lamp without a shade) on a table for each crew.  I will ask the kids to paint a picture of God or a prayer that God has answered or a prayer that they would like God to answer.  Under the black lights their pictures will be illuminated.  The glow bracelets are just an added wow factor.

The message:  Even though we can't always see God - He is there.  If we trust that God is with us, we will stand stronger.  Our pictures will be better illuminated under the black lights.  That represents our trust in God.

I ended up NOT painting.  I didn't think it would be worth the mess.  Instead, we did three other things:
1) We made Trust bracelets:  We used NEON bendy things with NEON pony beads.
2) We made Trust cards:  The kids drew a picture with regular markers on a NEON index card.  It was a picture of "Trusting God".
3) Finally, each kid got a NEON or WHITE balloon to play with under the black lights.

Glow in the Dark doesn't work under Black Lights.  It needs to be NEON!

We aren't going to have a Day 5 at Imagination Station - so I only have four days!  Let me know if you come up with something great that I could use!  :)


Thursday, May 23, 2013

Kids Crown

Kids LOVE to wear crowns.  Big Guy was helping me come up with craft activities for Vacation Bible School.  We decided to make our own version of a Kingdom Rock crown.

This is what we did:


  1. I cut a thick length of construction paper to use as the front of the crown.
  2. I put dots all over the front of the crown using tacky glue. (tacky glue doesn't run like regular school glue)
  3. Big Guy (Little Guy could do it too but he was sleeping) put sequins and little puff balls on the dots of glue.
  4. We turned the paper over and used masking tape to attach three chenille stems and two widths of paper to the back of it.
  5. Big Guy attached hearts to the chenille stems. (hearts were hole punched)
  6. We wrapped the crown around his head and stapled the two widths together to fit his head.
This was a super simple craft.  You could use any materials on hand to make the crown. We might use this craft for the pre-schoolers at VBS.

Monday, April 29, 2013

Noah's Ark - Canvas Painting Craft

For our last Sunday school class of the year, I wanted to remind the children that God always LOVES them.  We decided to do a craft on the theme of Noah's Ark.  I wanted the children to have a special craft that they could keep - possibly even hang somewhere in the house as a reminder of God's LOVE for them.

(The complete lesson plan is included after the instructions for the craft)

This is what we did for the craft:

 
  1. I purchased one canvas for each child.  The canvas was sold in 3 packs and cost $3.00 per pack at JoAnn's (on sale for 50%).  (Example of God's grace.  I told myself that I would only do this craft if I could buy a canvas for each kid at no more than a dollar.  I went to the store and they happened to be 50% off!)
  2. I used painter's tape to mark a cross on each child's canvas.
  3. The kids used a paint brush and tempera paint to create a RAINBOW on the canvas.
  4. After the paint dries, simply remove the painter's tape to reveal the cross.

I found the inspiration for our craft project on Pinterest: canvas art inspiration and this one too canvas art inspiration!


The Lesson:
*  I introduced the lesson using our puppet, Scotty the Lion.  Scotty placed a mirror in a sealed bag.  The kids pass the bag around to try to guess what Scotty brought.  The clue was:  God loves whoever you see in this bag.

*  I showed the kids a picture of the Bible story:  Noah's Ark.  The kids explained what they saw in the picture.

*  I used a model of Noah's Ark complete with animals and shared the Bible story with them.  The kids each held an animal while I told the story and at the right time placed the animal on the ark.

*  I explained that the rainbow is a sign from God that He LOVES us!

*  We completed the craft activity.

Tuesday, April 23, 2013

Alternative Science Experiments for Kingdom Rock VBS

I've been working on alternative science experiments for Kingdom Rocks VBS.  I found some at Steve Spangler's website:  Cool Science Experiments.  You can use this link to get directions for his science experiments.  Maybe you will find more that will work even better!  Leave me a comment if you do!

I created another blog post with what I think are BETTER alternative science experiments.  Make sure you check it out!  You can find it by clicking on the category:  Sunday School Lessons on the right hands side of this screen.

This is what I found:


Day 1:  God's Love Helps Us to Stand Strong
- Instead of puchasing the tumbler (with the marble choking hazard) we may use Exploding Art.  Fill a film canister with paint and alka-seltzer tablets.  They should explode leaving a colorful mess on the paper. I liked Spangler's quote:  A canister at rest stays at rest until "pop".  God's Love = Pop!   I found this experiment/art project on Pinterest.  Here is the link: Exploding Art


Day 2:  Family and Friends Help Us to Stand Strong
- Instead of purchasing the aqua boosters kids can make their own Diving Ketchup.  I'm hoping the kids will be able to draw stick people with sharpie markers on one side of the ketchup packet (which I'm going to ask a fast food restaurant chain to donate).


Day 3:  Prayer Helps Us to Stand Strong
- Instead of purchasing the balancing birds I will set up a station of Balancing Nails.  I think the balancing trick is a bit more impressive than the birds and will take the kids longer to figure out how to do it!


Day 4:  Trusting God Helps Us to Stand Strong
- Instead of purchasing the Anti-Gravity Tube kids will do a simple Huff and Puff Challenge.  The air inside the bottle represents God.  Even though we can't see it (the air) it is always there.  Even though you can't always see God, He is always there for you.


Day 5:  The Bible Helps Us to Stand Strong:
- Instead of puchasing Way-to-Glow Pens I hope to do Black Light Secret Message.  If I'm not able to get mini-black lights donated then I'll purchase a black light for a couple of dollars from Menards (they sell industrial black lights - those long tubes).  Another thing to know - Tide Laundry detergent glows in the dark under a black light.  You might be able to figure out something fun with that.


I hope this helps you plan for a God-Inspired week for your kids at VBS!

Sunday, April 14, 2013

Bible Super Hero Capes (Queen Esther, Good Samaritan)

The boys and I decided to do a project using the Bible as our inspiration.  Big Guy chose the story of Queen Esther.  Queen Esther was a Jewish Queen who saved God's people by exposing the high official Haman to her husband, King Xerxes of Persia, by asking him to save her life and the lives of her people.  She risked her own life to save thousands of others.  The essence of the story is that Queen Esther was brave and that God protects those who are brave in His name.  So we decided to make Super Hero Queen Esther capes.  You could make a cape for any "Brave Person" in the Bible. It doesn't have to be Queen Esther.  The boys LOVED LOVED LOVED this project! (and so did I)  I used this project again.  This time we made Super Samaritan Capes.  The pre-schoolers LOVED this project.  Its high impact for very little preparation!

This is what we did:


  1. Cut a brown paper bag down the sides so that it opens the full length.
  2. Trim off the sides (and extra length if it too long for the child).
  3. Use a paper punch to make two holes.
  4. Use ribbon to make a neck hole. Slide the ribbon into each hole punch and tape it down. Make sure that it is large enough to fit over the child's head. I wouldn't use string. I think it would cut the child's neck when he/she ran with it on.
  5. Decorate. Be creative!
  6. Big Guy drew pictures of all the BRAVE people he could think of (Real - his karate instructor and Imaginary - Rudolph)
  7. Little Guy put faith stickers on his cape and colored it.
  8. Mom wrote her name and used Bible verses.
We decorated our capes for at least a 1/2 hour or more. When we were finished we ran around the house trying to make our capes fly. It was so fun to talk with the boys about bravery as we made the capes.
 

Saturday, April 6, 2013

Prayer Rocks

We are going to make prayer rocks at Sunday school.  I LOVE how each rock will be  different and there will be virtually no clean up.  The kids don't even need glue!

This is what I did:


  1. I purchased supplies at the Dollar Store.  (1 bag of rocks - approx. 36 rocks/bag, containers - 5/$1.00)
  2. I purchased supplies at Walmart. (Easter Grass, multi-colored craft wire - 36 ft for $3, bag of glitter Faith Stickers - $5.00, sequins and pony beads - I already had them at home)
  3. I cut a piece of wire (about 8-12 inches depending on the size of the rock).
  4. Wrap the wire once around the rock and make a tight twist to hold it in place.
  5. Use a glue gun and secure the wire to the bottom side of the rock.  Be generous with the glue.
  6. Let the kids string beads, sequins, and anything else that you can think of onto the wire.  We made a rock for each member of the family.  They used each family member's initial to mark each rock. Twist the wire so that the beads don't fall off.
  7. Add Easter grass to the container.
  8. Put stickers around the container.
  9. Cut a circle to fit inside the lid.  I traced the label that came on the container and cut out the circles for the kids. 
  10. Color a picture and label it, "Prayer Rocks", and glue onto the lid.
I'm also going to put a copy of the Lord's prayer on the inside of the lid.  The kids can choose a rock each day as a reminder to pray for a family member or themselves!